Anajet FP-125 Print Head Replacement
customer
Get a Replacement print head for your Anajet FP-125 to repair your Anajet sprint
Caution: The Print head is very static sensitive, use antistatic protective equiment when working on it.
1 - Remove the Dampers. To avoid ink leaking, place dampers and tubes higher than the level of the ink cartridge.
2 - Remove the Ink Chip Holder[See Reaseating Ink Chip Holder].

3 - Release the Carriage and move it away from the right side of the chassis, see User Manual.
4 - Remove the Flat Flex Cable (FFC) Guide from the Carriage by releasing the three tabs on the right side. See Photo 3.2.4.1-2.

Photo 3.2.4.1-2
5 - Remove the three M2.6 X 8 screws securing the Print Head. Lift the Print Head straight up to remove. See Photo 3.2.4.1-3.

Photo 3.2.4.1-3
6 - Disconnect the two FFC from the removed Printhead.
Reassembly
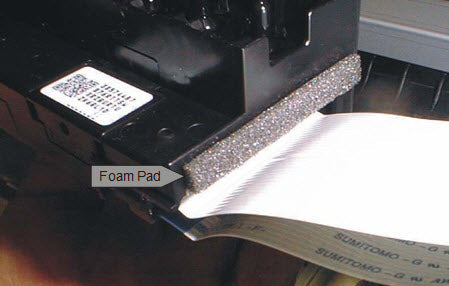
7 - Check to make sure the Foam Pad is attached to the end of the Print Head. See Photo 3.2.4.2-1.

Photo 3.2.4.2-1
8 - Check that the Foam Dam is properly positioned on the right guide pin. See Photo 3.2.4.2-1.

Photo 3.2.4.2-1
9 - Reassemble the Print Head by reversing the removal steps. When reinstalling the screws, use care to re-enter the same thread originally formed in the plastic carriage. While tightening the screws press the Print Head toward the rear of the unit. Tighten the screws in the order shown in Photo 3.2.4.1-3. Tighten the screws to 10 to 15 N cm (14 to 21 in ozf).
10 - Write down the new Print Head ID. The print head ID is written on each print head.
11 - Reassemble the dampers , ink chip holder and damper retainer.
12 - Using the Epson Adjustment program enter the new Print Head ID, sending any print jobs.
13 - Open EpsonADJ > Click Particular Adjustment Mode >”Auto Selection” and click OK > Select Input Head ID and Press OK >Enter the complete Head ID and press Input.

14 - Perform and ink charge and check for nozzle performance.
Get a Replacement print head for your Anajet FP-125 to repair your Anajet sprint


