Ink Supply Tube Replacement
customer1 comment
3.2 Ink Supply Tube Replacement
Ink tubes can be replaced if ink has dried within the tubes. This is best noticeable when the machine is flushed. We always recommend flushing the printer of all fluid before we remove the tubes. Leaving ink or cleaning solution in the tubes while they are being removed can spill ink into the printer or onto the electronic components of the printer which will damage the boards. If tubes are clogged and ink cannot be removed we can move forward with extra care. During these steps we will also be replacing all dampers and all the tubing in the carriage. It is always recommended you replace all dampers and valves when replacing the ink tube system.
3.2.1 Removing Ink Tubes
Tools Needed:
- Phillips Screwdriver
- Cutting Shears
- Flat Head Screwdriver
(1) Begin by releasing the carriage and removing the print head cage. See Photo 3.2.1

(2) Remove the Print head board retainer. There will be 2 Phillip screws 1 on each side. See Photo 3.2.2

(3) Start removing the Print head boards. Very carefully disconnect the print head ribbon cables from the print head boards. The print head ribbon cable will have a small board. On the board, you will see 2 tabs. It is very important that you remove the cable using this tab. DO NOT PULL ON THE CABLE. Remove all boards. See Photo 3.2.3

(4) We can now start cutting the tube above the damper Y splitter. You will have 6 tubes to cut from the dampers. See photo 3.2.4

(5) The last two tubes that are still connected are your Purge Tubes, cut the tubing above the Y splitter (only applies to MP10i). See photo 3.2.5

(6) You should now have all tubes loose and cut from the carriage. See photo 3.2.6

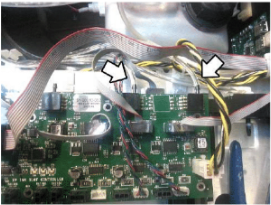
(7) We can now disconnect all cables from the Ricoh Carriage controller. You will have a total of 4 cables to disconnect.
(8) To remove the tubing from the black plastic E-chain, we must remove the top carriage cover. The top carriage cover is held by 4 phillips screws located in the back. Please note that there is a ground cable connected to one of these screws. When the 4 screws have been removed, you should now have the E-chain loose. Lay the E-chain flat to the left.
(9) With the E-chain straight, we can now pull the tubes from the opposite end of the chain. It is very important to make sure no fluid is spilled onto the printers electronics. Carefully pull on the tubes until they are removed from the E-chain. We recommend placing the tubes into a trash can to avoid any spilling.
(10) Now that our tubes are disconnected from the carriage side, we must now disconnect the tubing from the ink bay side. Begin by removing the ink bay cover. You will have 5 phillip screws underneath the ink bay cover.

(11) Start by unplugging the tubing from the CMYK valves. Use a small flat head screw driver to gently push on the tubing, use your other hand to pull on the tube at the same time. Be very careful not to damage the ink needle. Unplug all tubing from the CMYK needles.

(12) The back two needles (white ink) will have two tubes connected to it. Cut both the tubes from both valves. We always recommend replacing the White Ink needle valves when replacing the tubes.
(13) The remaining set of tubes (purge lines) should still be connected. To remove the purge lines, we must disconnect the tubing from the Ink Slot Boards. Use a small flat head screw driver to push on the tubing and at the same time you will want to pull on the tube. Be very careful when removing these tubes, the Ink Slot board can be damaged if too much pressure is applied by the flat head screw driver.

(14) We can now cut the tubing at the purge pumps. The purge pumps are located next to the waste ink tank in the far bottom right. Cut the right hand side tube (if you are facing the pumps).
(15) If the steps above were followed correctly, your tube sets should now be removed.
3.2.2 Replacing Ink Tube System
Tools Needed:
- Phillips Screwdriver
- 3/32 hex key / Allen key
- Cutting shears
Parts Needed mP10i
- Print tubes X 1 pcs (150205-001)
- Purge tubes X 1pcs (150207-001)
- Damper Sub X 6pcs (mP10 P/N: 150553-001)
- Y-Fitting Valve Assembly X 2pcs (White Dampers only) (P/N: 150591-001)
- Y Splitter Assembly with tube X 12pcs (P/N 150529-001)
- Elbow - Tube kit X 8pcs - (P/N: 150590-001)
Parts Needed mP5i:
- Print tubes X 1pcs (150205-001)
- Purge tubes X 1pcs (150207-001)
- Damper Sub X 6pcs (mP5 P/N: 150552-001)
- Y-Fitting Valve Assembly x 2pcs (White Dampers only) (P/N: 150591-001)
- Elbow - Tube kit x 8pcs - (P/N: 150590-001)
(1) Line your tube set at the very top and tape the end. See images below. The purge tubes (Set of 2) will have a T splitter. The T splitter should be facing up. See image below. It is very important that the tubes are arranged in this position. See Photo 3.2.1

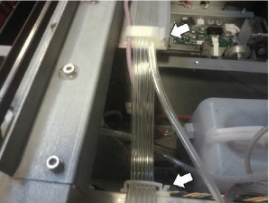
(2) Carefully feed the tubes through the E-chain below all the cables. See Photo 3.2.2

(3) When the tubes come out on the other side of the E-chain, the following measurements are needed. Measure from the edge of the E-chain. These measurements are very important, use a market to make a guide line on the tubes.
Print Lines 14 inches from E-Chain.
Purge Tubes 15.5 inches from E-Chain.

Print Tube #1 (yellow) will be on the right hand side; use a marker to mark the tube to avoid confusion. Purge Tube #5 (white 1) will be on the right hand side; use a marker to mark the tube to avoid confusion.

(4) We can now assemble our top carriage cover and connect all the cables to the Ricoh carriage controller.
(5) Bring in the tubes from the back, making sure that tube #1 (yellow) and Purge tube #5 are on the left hand side.
We can now start assembling our carriage tubing.
Carriage Tubing Assembly
CMYK Print Heads
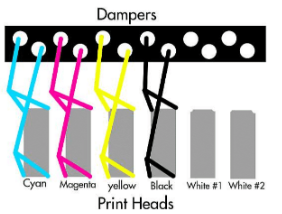
Each CMYK Print Head will have a Y splitter on both the back and the front. The tubing will measure 2.3 inches (6 cm). Following with a 5 inch (12.7 cm) piece of tubing with an elbow at the end. Each elbow will bend back and connect to the corresponding damper.


The white print heads consist of a Y splitter in the front > Followed by 3 inches (7.62 cm) of tubing > Y splitter > 2.3 inches of tubing > Damper valve.
The back of the print heads will have a Y splitter connected one for each purge line.
The valves will bend back and connect to the corresponding dampers.

Once all the tubing is in place, we can now start connecting our dampers. Grab your damper assemblies and start connecting them. Use the diagram above to make sure each tube is connected to the correct damper. Once the elbow or the valve are connected to the damper, you can not disconnect it anymore. If the elbow or valve is disconnected the damper will be damaged and can no longer be used. Using a damaged damper will result in poor ink flow and air will be introduced into the system.
When all the dampers are connected, we can now connect our Print and Purge lines to the dampers and heads.
Connecting Print Lines
We will start with the Print lines (Set of 6). Split each tube up to the top of the carriage. Connect the first tube to the first dampers. You will continue with the rest of the tubes until you reach #6. Its very important that the correct tube goes to the correct dampers. Mixing your tubes can result in an improper fill of ink and printing results will be poor. If there is extra tubing in the carriage, you can cut a small amount if needed.

Connecting Purge Lines
The purge lines (Set of 2) will connect direct to the back of the white print heads using the Y splitter. If there is extra tubing, cut a small amount if needed.

Your carriage tubing show now all be connected.
You can now Re assemble your carriage boards and retainers.
Ink Bay Tubing Assembly
Print Tube Assembly (set of 6)
Feed the Print lines and purge lines through the first holding clip. Then, follow the print lines only to the second clip.

Split your Print tubes (Set of 6) into 3. Split the tubes up to the second clip. Route the tubes to each side. Tubes 1-3 to the left, and tubes 4-6 to the right hand side.

Split tube #1 (yellow) and make the measurement to have the correct length to the needle. See image below. Once you have an appropriate length, we can cut and connect the tube to the needle. Make sure the tube is connected all the way into the valve. Do the same to tube #2 (magenta). KEEP ALL EXTRA TUBING PIECES WE WILL USE THEM LATER. See photo 3.2.13


Tube #3 (yellow) will have a small curve to the tubing. Its very important that the tube is not kinked or bent. If the tube is bent, it will result in poor to no ink flow.

Tube #4 (black) will have a small loop around the print lines. See image below. It is very important that the tube is not kinked or bent. If the tube is bent, it will result in poor to no ink flow. See photo 3.2.15

Print Tubes #5 and #6 (White 1 / White 2) will connect to the BOTTOM of the cartridge valve. It is very important that the Print line (set of 6) is connected to the bottom part of the valves. See photo 3.2.16

Your Print lines should now all be connected.
Purge tube assembly (set of 2 / white)
Route your purge tubes to the bottom clip see image below. The T splitter should be sticking out. The tubes split into 2 one side will have a round filter, and the other end will not.
Find the piece of tubing that does not have the filter. These tubes will connect to the pressure sensor on the back ink slot board. The board will have 3 pressure connections. We will only be using the back 2. Connect the tube to the pressure sensor.

Now group the remaining tube with the filters and we will connect them to the circulation pumps. The circulation pumps will have two sides. We will be connecting the filter tubes to the right hand side if you are facing the pumps.

We will now use a 12 inch piece of tubing to connect the other side of the pump to the top white cartridge valve.
Your tubing should now all be connected. Inspect all tubing before loading the printer with ink. If any tube is loose, you can risk the chance of introducing air into the system which will result in poor ink flow. Make sure no tube is bent or kinked which can cause poor or no ink flow.


Comments (1)
This helps alot. Thank you.