Replacing the Print Head Caps on the Brother GT-541
customer
6-1-12. Replacing the Cap Rubbers
(1) Make sure GT-541 is not in middle of any operation.
(2) Press the OK Button on the Control Panel to open the Menu Display.
(3) Press the Up/Down Button to select "Maintenance", and then press the OK Button.

(4) Press the Up/Down Button to select "Cap/Wiper Clean", and then press the OK Button.
(The Platen moves to its storage position, The Cap mechanism of the Maintenance Unit falls off from the Print Head Nozzle, and the Carriage moves to the center position and then stops.)
The message "Turn Off & Please Clean Cap & Wiper." appears.
(5) Turn off GT-541.
(6) Open the Front Cover as unlocking the Cover Locks.

(7) Remove the Wiper Cleaner Cassette by pulling it straight.

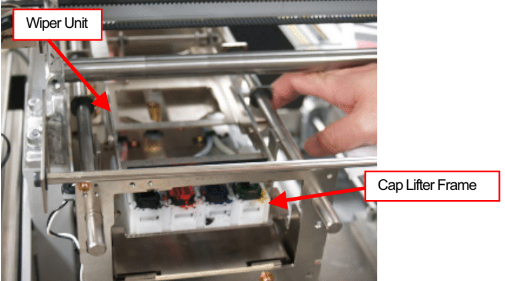
(8) Push back the Wiper Unit on the upper part of the Maintenance Unit to a position convenient for working.

(9) Lift the Cap Lifter Frame by hand and remove the L-shaped Tube Fitting downward from the Cap Rubber to be replaced by using a plyer etc.

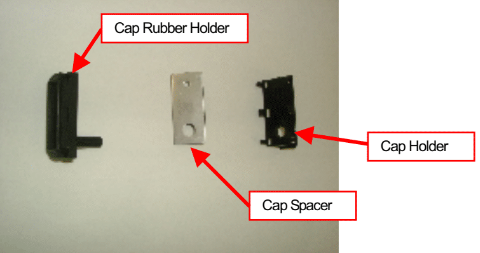
(10) Insert a flat-blade screwdriver etc. into the Front Window of the Cap Lifter Frame, then push in the lock lug of the Cap Rubber Holder (polyacetal resin) with the screwdriver to remove the Cap Rubber together with the Cap Rubber Holder.
<Note> Be careful not to let the two Springs jump out. Otherwise the Springs may be lost.

(11) Remove the Cap Rubber from the Holder. (Repeat this step for every Holder.)

(12) Fit the new Cap Rubber in the Holder.

(13) Set the Cap Rubber with the Holder back in the Cap Lifter Frame.
<Note>
Pull the Tube part on the bottom of the Cap Rubber from below to make sure that the Tube part runs through the bottom hole of the Cap Lifter Frame.
(14) Insert the L-shaped Tube Fitting back into the Cap Rubber until it stops.


